On my last few trips, I’ve used it as an opportunity to make some stereo (3D) photos of clouds and the land below me. Its actually quite simple to do once you get the hang of it.
- Make sure you have a window seat for starts. You don’t want to be crawling over the guy next to you trying to get a picture.
- Make sure you can lock the exposure off on your camera, this will make matching them up later a whole lot easier.
- A fixed focus is a big help here, last thing you want is the camera to try and focus on the window as your trying to take the second half of your stereo pair.
- Also you will want to be able to take at least two pictures at about one second apart.
Remember to hold off one snapping away until the pilot has given the all clear to use electronic devices, that is unless your using an fully manual film camera (BTW, even the one time use versions should work great for this).
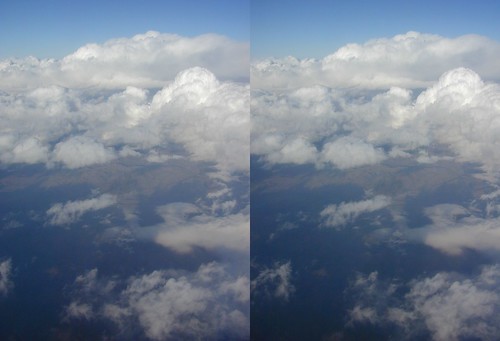
Once your on the way, try to pick cloud formations with good layering. I mean that because the plane is going to be moving well over 350 feet per second, your ‘eyes’ are going to be pretty darn far apart when you snap the pictures. A good foreground, mid-ground, and a background will make the pair stand out. The image above is a good example of what I’m talking about. Nice happy clouds with good depth to them.
As soon as you spot some nice formations brace yourself against the chair and window and take two photos in rapid succession. Try not to move at all between the button pushes because you want the pictures as close to the same orientation as possible. If the plane moves up and down a little that’s OK because you have to live with that. I’ve found that nice looking clouds and calm air are hardly ever in the same place. Once you get tired of clouds you can try shooting ground objects like cities and mountains. The bigger the better.
You should make note of what side of the plane your sitting on when you take your photos. If your on the right side of the plane the first photo in your set in the the right one and if your on the left its the left one. This will make more sense once you start putting things together. With a program like StereoPhoto Maker (mini review here) your can flip-flop the images to make cross-eye or parallel stereo pairs (anaglyph too if you want) with hardly any trouble but if you use a different method you might have problems getting the stereo effect to work for you.
My camera has the ability to view more than one photo that has been taken on it’s LCD screen so I can freeview them to see if I got what I wanted. This is a pretty handy trick if your using the ‘cha-cha’ or as I like to call it the ‘hip-switch’ method of taking stereo pairs while standing still (read the SPM mini review for more info on this technique).
So once your back on solid ground you can use a program like SPM or Photoshop to assemble your images to be viewed by whatever means you enjoy the most (cross-eye, paralell, two color anaglyph, full color anaglyph, shutter glasses, etc…).
I have a bunch of photos I’ve take on my past flights here on my Flickr account. If you make any of your own you should add them to them to the Stereophotography pool and tag them with "airborn 3d". If there are enough of them out there maybe I’ll start a pool of these sorts of photos. Thanks for reading and have fun !
have you ever had any problems with people thinking you’re a terrorist on a casing run or anything? Seems like snapping pictures might attract some suspicious looks.
Never from the seat of a plane but once I was asked what I was doing while I was taking photos at an airport from the car park. The guy was a passenger but it turns out he was a Federal Marshal. I told him what I was up to and he was pretty cool about it.
-John
Be very careful when doing this overseas. For instance, in India it is illegal to photograph any government facilities (I was detained for photographing an elementary school once). In an airplane, it is assumed that any photographs will include a government facility due to the wide field, so photography from an airplane is illegal. Other countries have similar laws. Be careful!
I have a different approach for taking 3D anaglyph photos.
I take just one photo (or even scan an old colour photo. Then I use SW to move the red left and the green right then merge the result. Then you can look at the result through red/green anaglyph glasses to get a 3D picture.
You can look at some on my website at this URL
http://www.savory.de/3dbilder.htm
All you get with that method is some flat photos which appear to float slightly above the screen – what’s the point?
You can’t avoid needing two photos if you want a worthwhile 3d image.
Yes, for a image with depth there has to be some sort of perspective change between the two photos. Now, if you were to isolate some elements on the image and shift them slightly in one direction or another and then make your anaglyph you would get the illusion of depth. I’ve seen software that will aid in this process.
-John
I’ve been doing this for several years — quite a few low-altitude 3D pairs from some favorite approaches like San Diego and San Jose.
I find it’s good to keep some part of the field “locked” into a common 2D location in the frame, as a sort of convergent point that will help the viewer lock the images.
Also, as with all handheld stereo pairings, be careful to avoid rotating the camera on-axis between frames.
nice Dramatic clouds!
This guy has some aerial photos from a remote controlled hobby plane (cheaper than airplane tickets!). They’re not taken from high altitude like an airplane, but it’s neat to see the landscapes he’s captured.
http://home.comcast.net/~jlballou/stereoaerial/smaersite.html
Maddy, thanks for referencing my site. I do have a bunch of non-aerial pics located at:
http://home.comcast.net/~jlballou/stereoaerial/index.html
I have many others posted at:
http://www.rcgroups.com/gallery/showgallery.php?cat=500&ppuser=14731
Note that all the pics in the last link are “cross-eyed” pics.
Nice picture. Where and when was it taken? I have many stereos on http://www.jetsamoocow.clara.co.uk
Charles: I think I was near Denver when I took that photo.